

If you want to create or edit records in your data source, you should look into the PowerApps patch function. It’s an improvement over forms, which can be restrictive when trying to create more intricate programs. Managing individual inputs and adding new records to your data source is a breeze with the Patch feature. Here we discuss everything about this function.
Patch lets you add or change database records in PowerApps. This tool enables you to select a table or data source, a record, and values to update or add. The function lets you add records to a data source, edit multiple fields, or do all three. The Patch function works well with other PowerApps methods to create complex data processes.
Patch Function in PowerApps:
Power Apps lets you create custom business apps without coding. PowerApps’ Patch function is vital. Patch lets users insert, update, or delete database records. Use it by providing the data source, record identity, and field values to edit or add.
The Patch function is useful for relational databases since it can update multiple tables simultaneously. It also lets users add and delete database records. Based on established criteria, they can use conditional logic to update.
Users should learn the Patch function syntax and how it interacts with their data source to use it effectively. Before making modifications or deletions, they should check permissions. You may become a certified PowerApps specialist with this training.

Patching function:
The Patch option makes storing Power Apps data easier than ever. Excellent apps can become remarkable with them. But how can one use the Patch feature well, and what is it anyway? Now, we can dissect it.
With the Patch feature, you can add or edit records in your database. This is a significant improvement compared to forms, which can be restrictive when trying to create more intricate programs. Managing individual inputs and adding new records to your data source is a breeze with the Patch feature.
Do you think it’s thrilling? However, let’s begin with the fundamentals before we go too far ahead of ourselves.
There is little complexity to the way the Patch function is structured. You begin by naming the process (in this case, “Patch”), then specify the data source you wish to update, and last, the modifications you want to implement. It’s that easy!
A Guide to Using the Patch Function in Power Apps
When working with Power Apps, the Patch function is a must-know. You can use it to insert or edit records in your database. When working on Power Apps, you will eventually come to terms with the idea that form control is a limiting element. In your application, you’ll encounter situations where a form control is insufficient. To use a gallery, you might have to conduct some inline editing. They have grown to prefer and no longer utilise the Patch feature above the form control. So, if you want to know how to use the Patch feature and all the great things you can do, you need to watch the entire movie. Learn more in detail with Power Apps Training.
Data sources like SQL databases, SharePoint lists, and Excel tables can have their data updated using the Power Apps Patch function. It eliminates the need to write code by letting you edit and create records automatically. This facilitates rapid iteration and updates for users who need to be more programmers. More complex uses of the Patch function include making tables into parent-child connections, updating several linked records simultaneously, and automatically giving newly formed documents unique IDs. Patch is a feature of Power Apps that allows you to:
- On the app canvas’s left sidebar, you should see the Data tab; click on it.
- To establish a connection to an additional data source, select Create New Connection.
- From the list of options that appears, choose “Add Data Source.
- Choose the type of connection you want (e.g., Excel file or SharePoint list), click on it, and then input the credentials for that connection when asked.
- After establishing a connection, launch the Advanced Editor by going to the ribbon menu and selecting View > Advanced Editor.
- Follow the steps outlined in Microsoft’s documentation for complete instructions on using this editor to enter your desired patch command. Ensure to include both the records you wish to edit and the values you would like them to have after the repair.
- Click “Done” when entering commands into the Advanced Editor, and then launch your program.
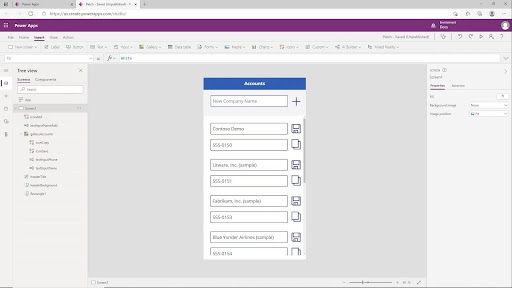
Modify or create a record in a data source.
After defining the data source, you can use this function with a base record:
A data source must have provided the initial record for record modifications. The base record has several possible origins, including the Item property of a gallery, a context variable, or some other mechanism. The data source can, however, be located using the base record. This is crucial because the record will have further information, making it easier to find the record for future editing purposes.
If you want to start with default values while creating a record, use the Defaults function.
Then, designate a record or records that represent changes; these records will have new property values that supersede the base record’s property values. When processing changes records, the argument list is handled in reverse chronological order, with later property values taking precedence over earlier ones.
When you call Patch, the result is the edited or added record. If you made a record, the data source might have automatically generated properties in the return value. There is no value for the fields of a connected table in the return value, though.
Take the following code snippet as an example: Set(MyAccount, Patch(Accounts, First(Account), ‘Account Name’: “Example name”)); following by MyAccount.’External Contact’.In full name. Here, you need help to provide a complete name. To get to the fields of a linked table, take a different lookup like:
Power Applications
The code looks for the account associated with MyAccount in the Accounts table.’External Contact’.”Complete Name”
Problems could develop if you make changes to a data source. To find and analyse problems, use the steps outlined in Working with Data Sources and the Errors function.
If you want to replace an entire record, you can use the Update method. If you’re going to generate a record, you can use the Collect function. To change several records’ characteristics depending on a condition, use the UddateIf function.
Modify or create a set of records in a data source.
Another useful feature of Patch is the ability to simultaneously generate or edit numerous records.
The second input can be a table of base records instead of just one. A table also contains the change records, which match the base records exactly. The quantity of records in the base table and each change table must be identical.
When you use Patch in this way, the result is a table where each record directly matches the base and changes records.
Merge records outside of a data source.
To merge records, choose two or more of them. Records processing occurs in the parameter list’s reverse chronological order, with the values of properties added later taking precedence.
The patch does not change its arguments or records in any data sources; it only returns the combined record.
Using the PowerApps patch function
Changing one or more records in a database is a breeze using the PowerApps Patch Function. To update records in a data source without changing other characteristics, you can utilise the PowerApps Patch function.
In other words, it will strictly adhere to the formula-specified field values when making updates.
Patch Function Syntax in PowerApps:
Changing Bijay’s phone number is as easy as following this basic Powerapps patch function syntax. It will solely modify the value of that particular field in the employee database.
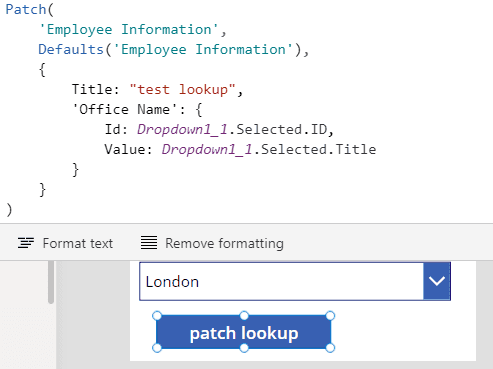
You can also utilise the Patch with Defaults function to add a new entry to the Data source.
If you wish to combine many records using Patch but need to utilise a data source, you may still do so with the PowerApps Patch function. Also Learn Demand Skills.
You can see an example of a formula combining an employee’s phone number and department into a single record below.
Modify or create a single record in a data source:
Below, you can see the syntax for PowerApps Patch Functions, which help generate or alter a single record in the data source.
In cases when,
DataSource:
You can choose the data source that already has the record you wish to edit or create a new one.
BaseRecord:
The file that needs editing or creating. The record is located and edited if it originated from a database. Use of the Defaults results in the creation of a document.
ChangeRecord(s):
You can edit the BaseRecord’s properties in one or more records. When processing change records, the argument list is handled in reverse chronological order, with later property values taking precedence over earlier ones.
Modify or create a set of records in a data source.
Listed below is the syntax for the PowerApps Patch Function, which facilitates creating or modifying several entries in a data source.
In cases when,
DataSource:
You can choose the data source that already has the record you wish to edit or create a new one.
BaseRecord:
You can edit or create this table of records. The record is located and edited if it originated from a database. Use of the Defaults results in the creation of a document.
ChangeRecordTable(s):
Every record in the BaseRecordTable can have its properties changed using one or more record tables. When processing change records, the argument list is handled in reverse chronological order, with later property values taking precedence over earlier ones.
PowerApps Patch Collection
You can use the power apps patch function to add or edit records to a data source based on a collection.
If the names of the columns in the data source and the collection you’re storing match, you can use the collect function to transfer data between the two. Then how can you bind collection data with columns that don’t match up? The examples below show how to use the Patch function in this situation.
Let’s pretend you have a collection with the following fields: empname and workphone. You want to add these entries to a SharePoint list with the following columns: Title and “Work Phone.”
Be sure to click Run OnStart after creating the collection by going to the app’s Onstart property and selecting Collection TempCollection.
Process of Patch Function in PowerApps:
You can utilise the patch function to add or edit one record or many records in a data source. By utilising this, one can change the values of fields independently of other characteristics. You can use the patch to sync data across different displays. The patch is a lifesaver when dealing with complicated kinds. Consider an example.
Step 1
Make a SharePoint list with employees’ names, several fields, and a data type.
Name – Single Line of Text
Address – Multiple lines of Text
DOB – Date and Time
Age – Number
Salary – Currency
Profile – Hyperlink
Step 2
Navigate to the PowerApp. Display the Name field’s label and Textbox on the screen
Put a Label on It. Pick Label once you’ve added it to the screen, and then in the Properties pane, modify its Text attribute.
Open the Insert menu and choose Textbox. Modify the Default and Hint Text properties of the newly added Select text input.
The process for adding additional Age Labels and text input is identical. Changing the Format attribute to Number is all that’s required.
Put up a new label and some rich text for “Address.”
Use the Input menu to include a date picker control for the user’s date of birth.
Update the property and add a text field for the LinkedIn profile URL
Label the salary and enter the number format using TextInput.
Step 3
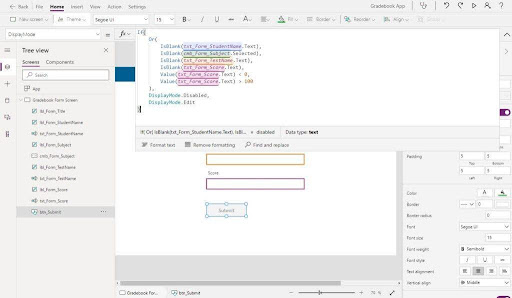
Next, expand the form by adding two more buttons: Save and Cancel.
Step 4
At this point, we’ll type in their Patch code and hit the Save button.
You must use the Value () function to transform the text to a number for the Number and Currency field. Control name is what it will use to save the time and date. Date of Choice
Patch Syntax
Update the source, record, patch, update, and…
Within this context, “source” denotes the List to undergo the operation.
If any updates are required, the record will specify which ones. If you wish to create a new document using Patch, you must use the Defaults function.
When discussing updating a record, you refer to the actual record itself. It can contain unlimited documents separated by commas and enclosed in curly braces {}.
Step 5
Incorporate Navigate(HomeScreen) upon the cancel button click.
Step 6
Execute the Screen and Insert Details,
Step 7
Once you’ve finished entering your information, hit the “Save” button. Go ahead and examine the data entered into the SharePoint list by navigating to the list.
Step 8
You may now display all data from the Employees list by adding one more screen that includes Gallery. Updated Powers > Incorporate a Vertical Gallery.
Step 9
After you’ve inserted the gallery, go to the Gallery > Right Panel and choose Employees as the Data Source.
Step 10
Create a new icon and attach the Navigate () function to the OnSelect property using the formMode – New.
Step 11
Add the Navigate() method with formMode – Edit when you pick the Next Arrow indicator.
Step 12
Navigate to the EmployeesData screen.< You have chosen Gallery1. Apply Field name> to every text value
Consistent with this method for all other controls.
To show either “Edit” or “New Employee,” you may also configure the header conditions.
Step 13
When you’re ready to save, open the file and follow the steps to update the patch function.
Step 14
To launch the programme, follow the arrows that appear on the screen.
Step 15
Update Complete all fields with unique data and then hit the “Save” button.
Step 16
Enhanced data is now visible to you.
Using the Patch function, you can add or edit records in the SharePoint list, all from the same interface. Patch allows us to modify an unlimited number of forms. Hopefully, this is of assistance. Enjoy your low-code journey!
Conclusion:
Finally, the PowerApps Patch function is an incredibly useful tool when building and managing records in a cloud-based program. It allows people to edit their documents without leaving their current apps. From mom-and-pop shops to large multinational organisations, this functionality is perfect for them. Its adaptability and scalability make it a great fit for many other fields and applications. Its ability to integrate with other services makes it even more valuable for data management and analysis.


